Editor
To start editing a Petri Net, open an existing net using the open dialog, open an example net from the File - Example Net menu, or create a new net by selecting File - New net.
If you create a new net, select the modeling features you are interested in using. Depending on the features selected the GUI will adopt the available options.
Normally you will select a draw tool from the Toolbar, or using a hotkey, you can lookup hotkeys in the draw menu.

| Icon | Tool | Feature | Hotkey |
|---|---|---|---|
| Select | Any | S | |
| Place | Any | P | |
| Transition | Any | T | |
| Urgent Transition | Timed | Y | |
| Uncontrollable Transition | Game | L | |
| Uncontrollable Urgent Transition | Game + Time | O | |
| Arc | Any | A | |
| Transport Arc | Timed | R | |
| Inhibitor Arc | Timed | I | |
| Annotation/Note | Any | N |
For details about the semantics of each elements please reference the corresponding semantics section: TODO
Draw
To start drawing select a draw tool from the toolbar, or using a hotkey. To place a place, transition or Annotation click anywhere on the canvas to place the element. For arcs, start by clicking a suitable start place or transition and clicking again to complete drawing the arc. The arc will automatically snap to any valid targe component.
TAPAAL will always make sure that the net is syntactically removing the need to preform extra syntax checking. TAPAAL will prevent you for adding invalid structures and display an warning if you try to violate the syntax.
Press Select or S at any time to go back to selection mode.
Quick Draw
When connecting an arc to a target, you can continue drawing an arc from the target location by holding ctrl while clicking the target.
You can also press the canvas while holding ctrl to create a new place or transition and connect the arc to this.

Edit Elements
Places and transition, including there text labels can be moved by moving the mouse to then, holding down left mouse button and dragging the mouse.
In selection mode you can select a single element by clicking it, or multilabel elements by holding down the left mouse button and dragging the mouse. You can further manipulate the selected elements by holding Shift and selecting individual elements, adding or removing the from the current selection.
Use hotkey Ctrl + a to select all elements.
You can delete the current selection by pressings Backspace or Delete or selecting Delete from the menu. You can move all selected elements by holding mouse down left mouse button and moving the mouse.
Click anywhere in the canvas to deselect all elements.
Text labels related to places, transitions and arc, can be repossession by dragging them. They will maintain there position relative to the parent object.
Place and transition names can also be hidden, by right clicking and selecting Hide Name.
You can edit an place, transition or arc by right clicking it and selecting Edit from the popup menu, or by double clicking it.
This will bring up an menu that allows you to change the properties of the element. The options available will depend on the chosen model features.
Arc Path
When drawing in arc you can curve the path of the arc by clicking the canvas, by default it will create a straight corner, holding shift will create a curved corner.
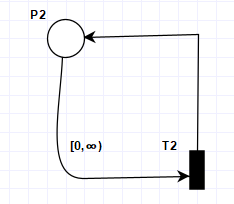
After a arc is drawn a new path point can be inserted by double clicking the arc while holding down ctrl, or by right-clicking the arc and selecting Insert point.
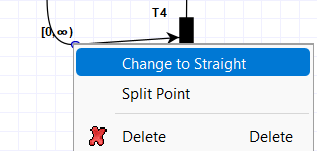
By default arc points are hidden, by moving the mouse over an arc or by selecting an arc they will be displayed. You can select and drag path point to move the path of the arc. Right-clicking an path point allows you to remove it or change the curve type.
Components
TAPAAL allows you to decompose larger models into components. Components are connected via shared places and transitions (draw with a hairline):
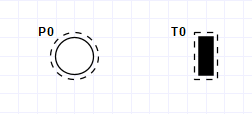
A share place/transition can be added to any number of components and thereby connect to components.
New components can be created in the Components section in the side menu:
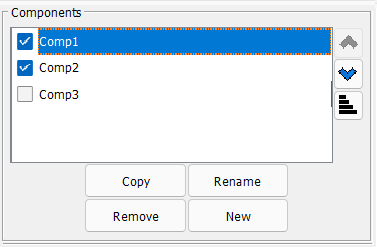
Select new to create a new component, or select copy to create a new component based on the current component.
You can create new share places and transitions from the side menu using the Shared places and transitions section of the side menu. From the dropdown menu select either share place or shared transitions and select new.
To add an existing share place or transition to a component. Add a place or transition and right click and select Edit. Check the Shared checkbox and select a shared element from the dropdown. A new share place or transitions can also be created directly by pressing the make shared button.

A component can be disabled by removing the checkmark in the components section. Disabled components are ignored in verification and simulation. This can be useful to create different implementation for a part of the system and swap between them.
Shared components can be merged into a single component by selecting Merge net components from the tools menu.